How do I create a ratings vote?

A Ratings Vote allows your audience to score a list of items against a common voting scale. The results graph displays each item’s average score. The highest scoring item can be set to highlight in a different colour.


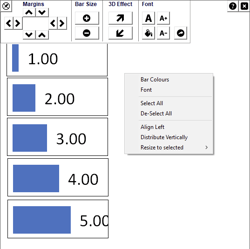
This is an example of a ratings vote:

Creating a Ratings Vote

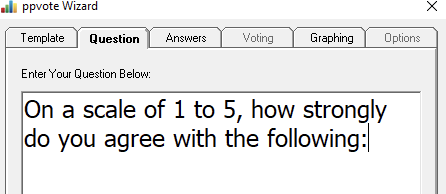
A standard multiple-choice voting slide cannot be converted to a Ratings Vote, a new slide must be created using the ppvote Wizard or you can edit an existing Ratings Vote slide.

From the Add-ins tab, select CLiKAPAD > New Slide Wizard > Voting Slide > Go Select Next to skip by the Template tab and to progress to the Question tab.

Enter your question directly into this panel. Select Next to progress to the Answers tab.

On the Answers tab, type each item to be rated on a separate line. It is important not to press enter in the middle of an answer. Also do not leave blank lines between answers.

Select Ratings Scale in the Fixed answers option section, to then present a further panel.

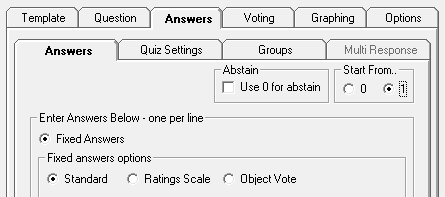
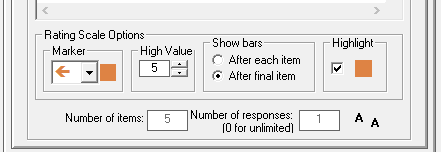
In Ratings Scale Options, select the High Value (the maximum rating for each option), in the below example each item will be voted on using a scale of 1 to 5.

Count up will show how many votes have been collected.

Count down will show a timer on the screen. We recommend reducing the default 10 seconds down to 5 seconds for Ratings Votes. Apply to All will apply these changes across all voting slides in the presentation.

Click Next at the bottom of the screen to display the Graphing tab.

There are two sub-tabs of Graph Settings and Display Settings. Graph Settings will allow you to choose the format of your graph e.g. 2D or 3D for example. Notice that a Bar graph is the only option.


Select Display Settings:

You can see how your graph will look in the Presentation Preview. If you don’t like the colours of the bars just click on any bar to change the colour. All bars are set to the same colour. You can edit the font style etc under the Graph Settings tab.

Use Set Graph Position button to resize and realign the graph in the same way as you would resize an object in Microsoft packages. You will see a preview of your slide with the graph showing. Simply use your mouse to drag the graph into position.

Use the toolbar to make amendments to Margins, Bar Size and Font.

The controls for a Ratings vote are slightly different to other types of vote.

You can click and drag each of the bars individually, or multi-select to move them all at once – right click on a bar to select (highlight turns red), right-click again to deselect.

Right-clicking inside the main boundary box gives you the extra menus shown for aligning your bars – resizing the main boundary box and using the Distribute Vertically option is the quickest way to align the graphs.

You can resize the selected bars using the cursor keys (shift + cursor resizes in larger increments).

When you have the graph positioned to your liking, click on the ‘x’ at the top right of the graph window to return to the ppvote Wizard screen.

Select Next to progress to the Options tab:

Reposition – select to display the Voting Indicator Box on the slide. Drag the box to reposition it to a better screen position to make sure that everyone can see it. Once finished, select the ‘x’ to close, to return to the ppvote Wizard screen.

Select Save & Go.


You can also choose marker symbols and colours here. The marker is the indicator that appears against each item to let the audience know which item is currently being voted on.


Select Next to progress to the Voting tab.

Running a Ratings Vote

A Ratings Vote runs in the same way as a standard vote, with either a counter or timer displayed on screen during the vote. In addition to this, you will also see a marker/pointer appear next to the current item being voted on. When the vote is closed for the current item the counter/timer will reset and the marker will move on to indicate the next item being voted on.

When the final vote is completed and closed the results will be displayed on screen showing an average score for each option. If selected, the highest-scoring item will be highlighted in a different colour.