Select one of the templates from the list that uses the object vote, e.g. ‘Yes/No/Maybe – Green/Red/Amber boxes’. A new voting slide will now be created in your presentation.
Edit the slide that has been created using standard PowerPoint tools, all items on an object vote slide are standard PowerPoint boxes, text boxes, shapes, etc. and can be altered as required.
To make changes to the way the vote runs, or to add more voting options load the slide editor by selecting CLiKAPAD > Slide Editor.
This will launch the editor for that slide, defaulting to the Answers tab.
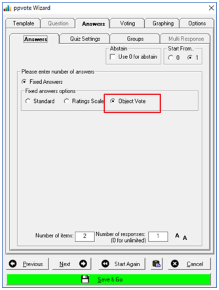
This is defined as an Object vote.
For a Yes/No question there are two items as there are two answers to choose from, you can alter the number of voting items from here.
Count down will show a timer on screen. We recommend 10 seconds.
Use Apply to All if you wish apply these changes to all slides in the presentation.
Select the Graphing tab to alter how the results are displayed, either as percentage, number or both

From the Options tab select Reposition to display a preview of the Voting Indicator Box on the slide. Drag the box to a position where everyone can see it. Once finished, select the 'x' to close and return to the editor.
Use Apply to All if you wish to set the Voting Indicator Box position across all the slides in the presentation.
Select Save & Go.

Running an Object Vote
An object vote runs in the same way as a voting slide that shows a graph, the only difference is when the vote is closed the results are shown in the placeholder boxes and no graph is shown. See the section on Running a Live Vote.